
The Filming and Editing Process
The editing process for my Documentary is extremely long winded and it take and extremely long time to film and piece together a shot which may only be used for a maximum of 10 seconds. Below i am going to explain the process I have been using to film and edit my documentary.
The Filming
When creating my documentary I always had in the back of my mind that I wanted my footage to look as professional as possible. I started looking and researching other documentaries, and as well as watching and listening to what was being said, I also payed careful attention to the techniques being used in portraying what was being said.
I picked up on a number of things from this research, but one of the things that I took most from the research was the fact that AUDIO is just as important as VIDEO.
For filming, I am using a HD SLR Camera with a variety of Lenses. The advantages of this is that when you get the shot right, the output is crisp and professional looking. However the disadvantages are that is takes time to set up the shot due to the fact that the camera has no auto-focus and is a SLR camera. The fact that there is no auto-focus means that I have to manual focus ever shot. This poses a large problem however I have found a number of ways to overcome it, which i will talk about more in my directors cut.
You will see in my documentory that i have also taken note of the effectiveness of using the Rule Of Thirds. I have found that this rule really does make a difference on how professional your footage looks, and have been using it frequently in my documentary.
You will see in my documentory that i have also taken note of the effectiveness of using the Rule Of Thirds. I have found that this rule really does make a difference on how professional your footage looks, and have been using it frequently in my documentary.
What makes the filming even more complicated is the fact that because I was
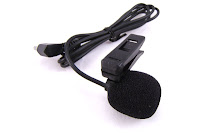
both my video and audio footage to be sharp and professional, I am not using the audio from the camera. Instead I am using a external lapel microphone which records onto an external hard drive. Using a lapel microphone brings a number of benefits to my documentary.
Firstly, Using a lapel microphone means that I am able to obtain high quality audio due to the fact that the audio is taken from a microphone which is only a few inches from the mouth.
The other great advantage of using a lapel mic over the internal microphone of the camera is that no matter where you are in relation to the camera, the audio is always the same quality and level. This has proved great in some of my shots as it means I am able to walk up or into the shot whilst talking and even be extremely far away from the camera, as I will still have perfectly clear audio.
On the other hand however, this perfect audio quality does come at a cost in the editing process.
The Editing
Because of the complex way I have chosen to record my video and audio, it means that a lot more time is needed in the editing process.
The first phases that I have to go through is uploading from the camera and hard drive all the audio and video footage. Once this has been completed, I then concentrate on editing and cleaning up the audio to make it even clearer.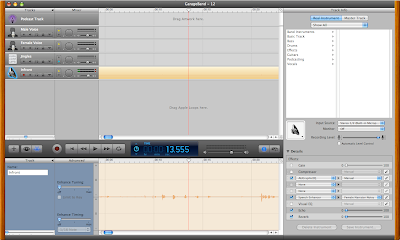 To do this, I import the audio into Garage Band(mac) and then tweak both the Equalizer and Speech Enhancer setting until the audio is crisp and free of any background noise.
(As show in image on the left)
Once the audio clip is all cleaned up, it is then exported into an MP3 format. This process is repeated to all the audio that is recorded.
Once all the audio has been exported, it is then time to add the audio to the video. Using IMovie I import all the video footage into an event. Then for each clip of video that has been recorded, I have to find the corresponding audio file (which was just exported) and overlay that audio file on top of the audio from the camera. By doing this and movie the audio about, I am able to perfectly sync the two audio tracks (1:Original Audio recorded from the camera mic, 2: The Lapel Mic) and then mute original audio from the camera. This is time consuming as it is often hard to get the two tracks in dead sync with eachother, but with time it is possiable.
Once I have added in and synced the audio, I then treat the video with some lighting effects so make it more effective, and then finally export the file.
This step is repeated until all the video files have been audio syned and exported.
Then finally I import all the new video files into IMovie, and am finally able to edit the files together knowing that they have both perfect sound and video quality.
I'm sure after reading this, you can now see how for just a 10 second clip in the final documentary, it takes hours to film and edit...but I feel that it is worth it for the end result!
The Editing
Because of the complex way I have chosen to record my video and audio, it means that a lot more time is needed in the editing process.
The first phases that I have to go through is uploading from the camera and hard drive all the audio and video footage. Once this has been completed, I then concentrate on editing and cleaning up the audio to make it even clearer.
 To do this, I import the audio into Garage Band(mac) and then tweak both the Equalizer and Speech Enhancer setting until the audio is crisp and free of any background noise.
(As show in image on the left)
Once the audio clip is all cleaned up, it is then exported into an MP3 format. This process is repeated to all the audio that is recorded.
Once all the audio has been exported, it is then time to add the audio to the video. Using IMovie I import all the video footage into an event. Then for each clip of video that has been recorded, I have to find the corresponding audio file (which was just exported) and overlay that audio file on top of the audio from the camera. By doing this and movie the audio about, I am able to perfectly sync the two audio tracks (1:Original Audio recorded from the camera mic, 2: The Lapel Mic) and then mute original audio from the camera. This is time consuming as it is often hard to get the two tracks in dead sync with eachother, but with time it is possiable.
Once I have added in and synced the audio, I then treat the video with some lighting effects so make it more effective, and then finally export the file.
This step is repeated until all the video files have been audio syned and exported.
Then finally I import all the new video files into IMovie, and am finally able to edit the files together knowing that they have both perfect sound and video quality.
I'm sure after reading this, you can now see how for just a 10 second clip in the final documentary, it takes hours to film and edit...but I feel that it is worth it for the end result!
No comments:
Post a Comment